In the winter of 2020, after the fires and in the midst of an ice storm and some person stuff I was dealing with, I decided to build a skin-on-frame canoe. I was looking for a project to take my mind off things, and I had wanted to build a little canoe for years. Here's a blog I put together about it. I enjoyed that so much that I built a kayak the following winter.
So here it is the winter of 2023, and I've decided to take on another project; a wooden standup paddleboard. I ordered plans and some pre-cut parts from Sliver Paddleboards. My friend Mark, who has generously let me use his shop for other projects, decided he'd build one too.

These are the pre-cut pieces I got from Silver Paddleboards. When assembled, they'll make up sort of a "fish-bone skeleton" that the board is built around. The stack of pieces will be the ribs of the skeleton, and the two pieces to the right are sections of the spine.
Though I could have made these parts myself, I decided to get them from Sliver Paddleboards. The plans for these would be a separate purchase from the plans that I did buy, and the cost of those plus the cost of the plywood would only be a little cheaper than getting the parts already cut out. Saved a lot of time too...

Here I'm gluing two of the four pieces of the spine together. The parts connect with a dovetail shaped key.

Here's the skeleton all put together. The parts are cut out very accurately, and they notch together nicely. The hump on the top/front of the spine, with the word "Gusset" written on it, will be removed later in the building process. It's there to reinforce that part of the skeleton, which will be under a lot a stress in the steps ahead.

The outside of the boards will be made from thin planks of cedar. Western red cedar is the wood of choice for the boards, given its low density and good strength-to-weight ratio, i.e. it makes for a strong, light weight board. Mark's board will be 11'2" long, and mine will be 10'. We visited three or four lumber yards where we searched through stacks of wood looking for high quality lumber. We ended up getting some nice 1x8's, 1x10's and 2x6's, ten and twelve feet long. The next step was to "re-saw" these 1" and 2" thick boards, (actually 3/4" and 1 1/2" thick), into 1/4" thick pieces. (Re-sawing refers to standing a board on its edge and sawing a piece from its thickness, as opposed to what's commonly called "ripping" a board, laying it down flat on a bandsaw or tablesaw and sawing a piece from its width.) In the photo above we're resawing a 2x6, using Mark's bandsaw. Ultimately the top of the boards will end up being about 5.5mm thick, and the bottoms 4.5mm. For reference, 1/4" is about 6.4mm.
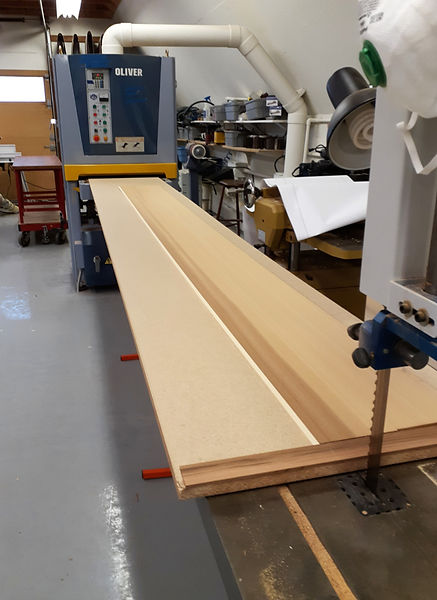
Here we're getting ready to pass a 1/4" thick plank through a wide belt sander. This machine will sand a board down to a set thickness. It can only take off a little thickness with each pass, so it took quite a few passes to get our 1/4" thick planks sanded down close to finished thickness. The plank will be passed through the sander on top of a 12' long piece of 3/4" particleboard. Without the added thickness of the particleboard, the sander would not sand thin enough for our purposes.
The light colored strip of wood on the left edge of the plank is Alaskan yellow cedar. It's added as an accent to the darker western red cedar. The top and bottom panels of my board will be made up of five separate pieces of wood glued together. The paddleboard will be 30" wide, but the sander is only 24" wide, so I glued up sections of the panels that were narrow enough to fit through the sander, and then these sections will be joined together after they're sanded.

Gluing the sections of the panel together using bar clamps and weights. Mark salvaged about a ton, literally, of these ten-pound weights from a gym in town that was getting rid of some of their older equipment. The line of diagonally placed weights to the left is there to keep the two sections of the panel being glued pressed flat to the table. The weights to the right are there to counteract the tendency of the long bar clamps to lift up the edge of the panel.
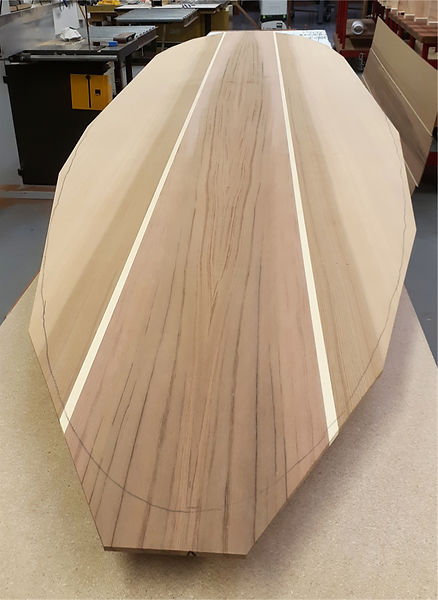
The bottom panel of my board, roughly cut to shape. The center section of the board is what's referred to as a "bookmatch". To get a bookmatch, you resaw a piece of wood, then open that piece as if you were opening a book, then you join those two pieces together. The two pieces to the left and the right of the yellow cedar stripes are bookmatched as well, though from a different board than the center section.

This is the "table" that the board will be assembled on. The bottom panel will be placed on the table, then the skeleton will be glued on top of that. Each rib of the skeleton will align with one of the vertical pieces. The top edge of each vertical is shaped to match the shape of the bottom of the corresponding rib. The bottom of the paddleboard will not be flat across its width. If you look closely at the second vertical from the left, you can see that there's a subtle curve to it, rising up in the middle. That curve flattens as you get to the middle of the board, and then slowly transitions to curve in the opposite direction towards the tail of the board. The heights of the vertical pieces correspond to the curved shape of the spine.

Here the skeleton is glued onto the back panel of the board. The outline of the skeleton was drawn onto the back, showing us where to apply glue. After there was glue where every piece of the skeleton would go, we carefully set it into place. It's difficult to clamp such a complex shape, so we used a bunch of weights, in addition to a few clamps, to hold the skeleton down tight against the back, and the back down tight against the table. I totaled it up, and that's about three hundred pounds of weights.
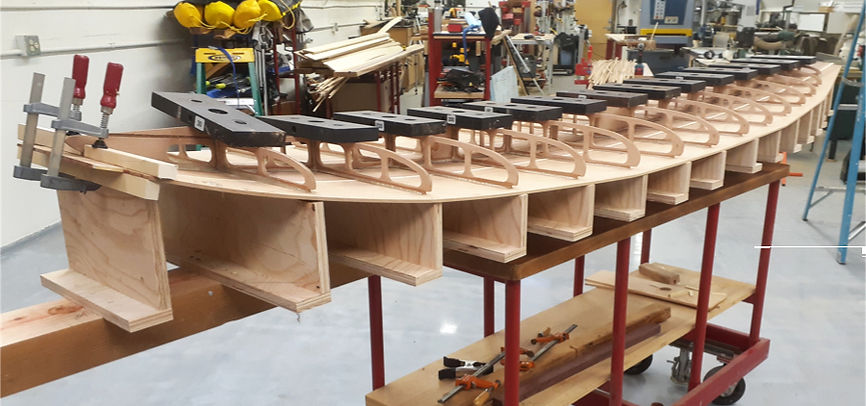
The glue has set, and I've removed most of the weights and clamps. I left the weights along the spine to help insure that the assembled parts don't spring back and lose some of their curves. As more of the outside skin of the board is applied, the curves will be locked into place. Before the skeleton was glued to the back it was pretty floppy and had to be handled carefully to avoid breaking it. It's surprising now how stiff the ribs and the spine feel.

The next step will be to build up the "rails" of the board, the outside edges along its length. It's a very tight curve going from the bottom of the board to the top, so this section will be built up using narrow strips of cedar. Here I'm using a table saw to "rip" some of these narrow pieces. The green machine in the middle of the picture is a power feeder. It holds the wood down tight against the saw table and fence, and helps push it through. Dusty business...
That's as far as we've gotten as of today, March 10th.