Progress on the paddleboard has been a bit slow over the last few months. There are a lot of steps involved in this project, and limited time to devote to it. It is coming along though. I hope to have it ready to put in the water before too long.

At the end of the first page documenting the building of a wooden paddleboard, Mark and I were sawing thin strips of cedar to build up the sides of the board, also referred to as the rails. The picture above shows a sample of how these "bead & cove" strips will be glued together, making the transition from the bottom of the board to the top. The strips are 1/4" wide by 3/8" tall.

This is a close-up of the router setup for milling the "bead" on a strip. The router bit at the center of the picture spins at a very high speed, and the strip is passed by it to form the convex edge.

Milling the "cove".
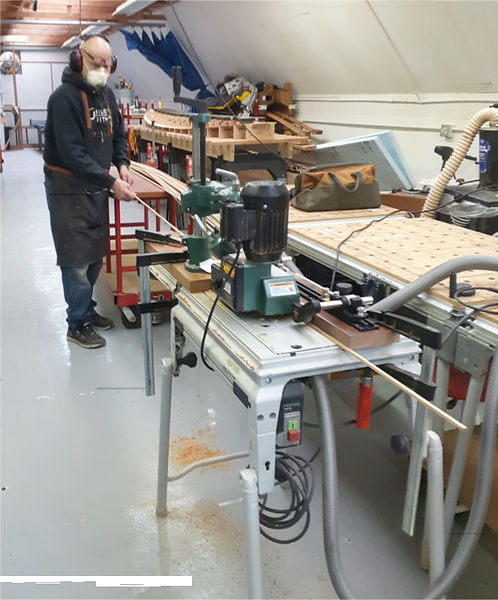
This shows the whole setup for milling the "bead & cove" strips. We're using a power feeder to push the strips past the router bit, which is driven by a router motor mounted underneath the table. I'd feed the strips in from one side, and Mark stacked them up as they came out the other.

Gluing the first strip to the bottom of the board, defining the outline. This strip is rectangular in cross-section, without a bead or cove.

Next comes the "foundation strip", with a bead on the top but no cove on the bottom. It's glued to the bottom of the board and the side of the outline strip.

It takes a lot of clamps to hold the strips in place while the glue dries. Between Mark and I, we have a couple-hundred of these spring clamps.

The strips require a sharp bend at the nose of the board. Here I'm steaming a strip by putting a wet cloth over it and heating that with irons. This softens the wood enough so that it can be bent around the curve without breaking. Even with steaming, I still broke a few strips which had to be replaced. Knowing this might happen, we milled up plenty of extra strips.

One-by-one, strips are added to the rails, letting the glue dry before adding another strip.

Finally there are enough strips added to complete the transition from the bottom of the board to the top. The strips were allowed to run long at both ends of the board, and will be dealt with later.

There's a lot of work at this point cleaning up the excess glue that's squeezed out from between the strips. A course file worked well for the job.


After most of the glue was filed off, the strips were blended into a smooth curve from the middle of the rail up to the top edge. The bottom panel will be trimmed off even with the rail strips.

The rails at the nose and tail of the board will be made up of solid blocks of cedar. Here I'm sawing off the extra strip material at the tail in preparation for fitting the blocking.


I glued two pieces of 1 1/2" thick cedar together to make the blocking for the nose of the board. A similar block was made for the tail.

The block was cut to a rough shape on the bandsaw. I added a reinforcement to the joint in the middle of the nose block by routing a slot and gluing in a piece of hardwood. The block might be under a good bit of stress as it's glued into place, and I didn't want the joint to break in the process.

The ends of the rails and the ends of the block needed to be trimmed until they fit together well. I used a sharp chisel for the task.

Once the pieces fit together well, the block was glued into place.


The blocking needs to be carved to blend in with the shape of the stripped rails. Here I'm using a drawknife to roughly shave away some of the extra wood. (I actually do this with a hand of each of the handles, but I needed one hand to snap the picture.)

Shavings from the drawknife.

Refining the shape of the nose blocking and the rails with a spokeshave.

With the rails and the blocking now smoothed close to their final shape, it's time to "feather" the rails. This picture from the plans shows what that means. The top edge of the rails will be planed down, with a hand plane, until they form a tangent with the curve of the ribs. This makes a flat area that the top panel of the board will be glued to.

"Feathering" the rails.

Planing a flat, smooth area on the nose blocking where the top panel will be glued.

I put the blue tape on the rails to make it easier to see exactly where I had planed the flat "feathered" area to. As I planed away the wood, I also planed into the tape. It's important to get a nice smooth curve along the length of the rails, where the flat portion meets the rounded part of the rails, and the tape makes it easy to see that line. If I were to end up with a wavy curve, it would show up later in the line where the top panel intersects with the rails.

Looking forward from the tail. There are a few more steps to finish off the inside of the board and then it will be ready to glue on the top panel.

"Dry clamping" (without glue) the top into place to see how well it mates with the rails.

Minor Disaster! After putting on a couple clamps to hold the top down, I heard a loud "snap". Damn! The top panel cracked along a grain line and then along the seam between the red cedar and the yellow cedar. My mistake was using just a few clamps to pull the top down tight, which focused all the tension right by those clamps. If I had used a lot of clamps, spread along the length of the board, that tension would have been more evenly distributed and the top probably wouldn't have cracked. Anyway... I can glue the crack back together, and it probably won't show at all in the finished board. It's a good thing that the crack happened at this stage, rather than when I was actually gluing the top down, as then it would be a real mess with glue everywhere and having to take the top back off to repair the crack.
That's it for now.